How to Grow Prize-Winning Dahlias: A Vintage Organic Guide
- Jason Beck
- Mar 17
- 14 min read

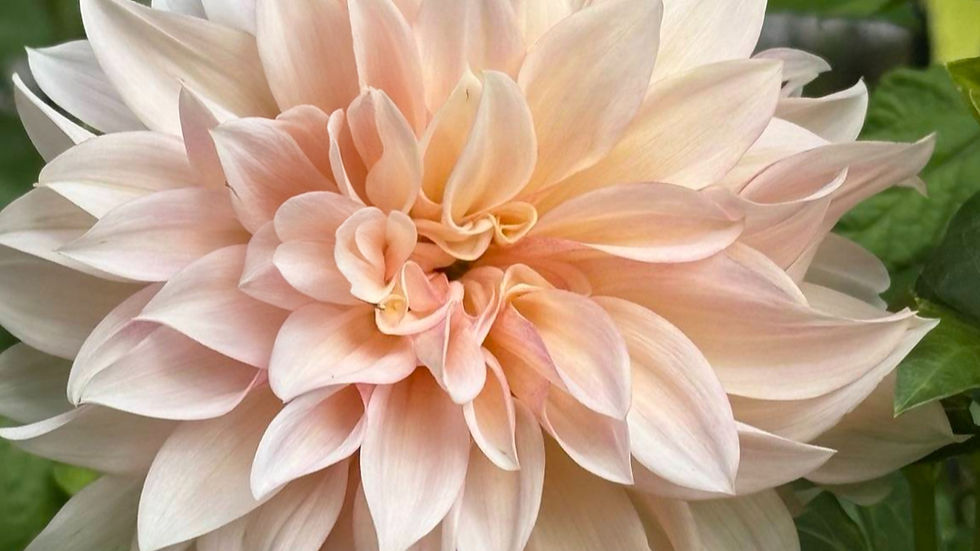
Originally published in "Organic Gardening and Farming" (May 1964) by Harry L. Dixon, this timeless advice holds up beautifully for today’s organic gardeners. Raised for their beauty, dahlias respond incredibly well to organic care. Here is Dixon’s classic guide to producing prize-winning blooms.

There is no good reason why you cannot grow prize-winning dahlias just as well as the neighbor you envy. If you want to start a collection of awards, follow these foundational steps for success.
Preparing the Soil for Planting
Begin by getting down to earth—working the soil into a mellow consistency with excellent drainage qualities, a plentiful supply of humus, the basic N-P-K trio, and all-important trace elements.
Even if your garden is in excellent condition from years of composting with well-rotted manure, it pays to add bone meal when planting dahlia tubers.
Aerate the Soil: Use a rotary tiller or a shovel to loosen the soil down to 6 inches.
Add Nutrients: Scatter two handfuls of bone meal where each tuber is to be planted and mix it in.
Staking and Planting Dahlia Tubers

Once you decide where your dahlia tubers will go, drive your stakes in before you plant. Dahlias attain a height and breadth that makes their branches vulnerable to strong winds long before buds appear.
Spacing: Plant tubers on both sides of each stake, set in rows 54 inches apart, with 42 inches between rows. Planting two roots to a stake reduces the number of stakes needed and increases the visual beauty of the garden.
Staking Materials: Use whatever is sturdy and cost-effective, such as 5- or 6-foot lengths of unseasoned furring. Drive them deep using a pilot hole to ensure they are vertical and secure.
Planting Depth: Scoop out enough soil to set the tuber horizontally about 5 inches deep, with the stem end at least 4 inches from the stake to prevent wind bruising later on.
Covering: Half-fill the hole and press the soil firmly around the tuber. As the shoot pushes up, pull loose earth over it gradually until the hole is nearly filled, leaving a shallow saucer to catch rain.
Planting must wait until the soil is workable and the danger of hard frost has passed—usually around mid-May for growers in the Northeast.
The Secret to Grow Prize-winning Dahlia Big Blooms: Topping, Disbranching, and Disbudding
During the critical growing stage, large-flowering dahlias demand constant attention. To achieve long, strong stems and massive blooms, you must prune away surplus growth. This three-step program is essential:
Topping: As soon as two pairs of leaves appear, pinch off the tender young stem just above the second pair.

Disbranching: After topping, four leaves remain. A bud in the angle of each leaf stalk will produce a secondary branch. Allow only one bud (the stronger of the lower pair) to grow on each. Remove all other branch growths by snapping them off carefully. You will be left with 4 primary stems, each bearing a secondary branch.

Disbudding: When 3 flower buds appear at the end of the 4 primary stems, save the best one (usually the middle) and rigorously remove the others. After each primary stem has produced its big bloom, cut it half-way down the stalk so the secondary stems can flower.

Organic Pest Control and Moisture Management
An adequate, ever-present supply of soil moisture is the most essential factor in cultivating dahlias. When in doubt—mulch! Wait for the soil to warm up in the spring, then apply loose hay 6 inches deep, renewing it throughout the season.
Healthy, organically fed plants naturally resist pests. To manage local populations organically:
Trap Crops: Plant raspberry bushes or grapevines nearby to draw Japanese beetles away from your dahlias, making hand-picking easier.
Pruning: If you notice signs of the tarnished plant bug (dwarfed plants with short, brittle stems), cut back the affected stems to the base to encourage fresh growth.
Cutting Blooms for Indoor Display

When it's time to harvest your reward, timing and technique are everything. Cut your blooms when they contain the most moisture—late evening or early morning (around 3:00 a.m. is ideal for exhibitors).
Use a very sharp knife.
Make a clean cut just above a secondary branch.
Pro-Tip: Make your final slanting cut under water so no air bubbles can seal off the water-conducting cells.
Digging and Overwintering Dahlia Tubers

Dahlia roots are tender and cannot survive freezing ground temperatures. They must be dug up and stored.
Cut Back: Cut the plant down to within a few inches of the soil after the first killing frost.
Dig Carefully: Use a shovel to cut a 12-inch semicircle around the plant. Carefully lever the massive clump of new tubers out of the hole.
Label: Immediately write the variety name or symbol directly on the tubers with an indelible pencil.
Wash and Divide: Wash the excess soil off the clumps with a hose. Divide the clump, ensuring a small section of the parent plant's original stem (where the "eyes" are) remains attached to each tuber.
Store: Pack the divided tubers in dry sawdust or expanded mica in a cool cellar to prevent drying out over the winter.
There is deep satisfaction in planting, tending, and eventually showing off a perfectly grown dahlia. Plant a few tubers this year, get your hands in the earth, and enjoy the process!
Writers Note: While Harry Dixon wrote this for New York growers in 1964, his mid-May planting advice is perfect for our local New England climate in RI, CT, and MA.
Ready to grow your own prize-winning garden this season? Join us for our upcoming regional tuber sales! We’ll have a spectacular variety of healthy tubers ready for spring planting.
Sunday, May 3, 2026
Saturday, May 9, 2026
Perfectly timed for planting across Rhode Island, Connecticut, and Massachusetts. Check out our site to see 2025 varieties sold to get an idea on what we'll be featuring!
The Original 1964 Guide by Harry L. Dixon.
I Grow Only Prize Dahlias
HARRY L. DIXON
Reprint of Article from "Organic Gardening and Farming" Printed May, 1964 for free distribution
Raised for their beauty, dahlias respond to organic care by producing prize-winning blooms.
DON'T JUST STAND THERE; there’s no good reason why you too can not grow prize-winning dahlias as well as the neighbor you envy. If you want to start a collection of awards, just stay with me and I will tell you how success may be yours.
Begin by getting down to earth quite literally — working the soil into a mellow consistency with good drainage qualities, a plentiful supply of humus, plus the basic N-P-K trio and the all-important trace elements.
Although the soil in my garden is in excellent condition after many years of composting with well-rotted manure and turning decayed mulches under, I still add bone meal when I plant dahlia roots and later top-dress when manure is available and time permits.
When I worked with a few dahlias, soil preparation before planting was done with a round-nosed shovel and rake. But now, my rotary tiller is the perfect instrument for aerating the soil and churning it into an ideal planting consistency. I scatter two handfuls of bone meal where a root is to be planted and mix it in as the tiller’s mechanical fingers loosen the soil down to 6 inches.
Drive Plant Stakes in Before Starting Roots
Once you decide where your dahlia roots will go, drive stakes in before you plant and, if possible, even before preparing the soil. The dahlia needs to be supported because, long before any buds appear, it attains a height and breadth that makes its branches vulnerable in a strong wind.
I plant my roots on both sides of each stake set in rows 54 inches apart, running east to west. The rows are 42 inches apart. Planting two roots to the stake reduces their number by half and increases the beauty of the garden. The fewer the stakes, the better, particularly early in the season when plant foliage is scanty.
A wide variety of materials may be used for staking. Use whatever is handiest and cheap. From a local sawmill, I am able to buy unseasoned furring reasonably that comes in 5- or 6-foot lengths and is roughly one by two inches thick. Each stake is sharpened to make deep driving possible, although a pilot hole is first made with a steel crowbar. Take some care in making the hole vertical to insure uniform rows and a pleasant appearance. Some gardeners stain their stakes a dark green to make them less obtrusive.
Actual planting is simply and easily done. Holding the root in one hand, I scoop out enough soil to set it horizontally about 5 inches deep with the stem end at least 4 inches from the stake. I know from sad experience that a bloom set too close to the stake may blow against it and be badly bruised.
I next half-fill the hole and press the soil firmly around the root, taking care not to harm the small developing shoot. Later, as it pushes up through the soil, I pull loose earth over it from time to time until the hole is nearly filled except for a shallow saucer left around the young shoot to catch the rain.
Frost is the "villain of the piece," both at the end of the season and, to a lesser extent, at the start. Planting must wait until the soil is workable — usually about the middle of May in Schenectady, New York. While we count on some frost after this date, it does not delay planting because the young shoots appear a week later or more.
Dahlia plants are readily damaged by frost but may be safely protected under an inverted flower pot, basket or carton. Don't give way to despair if a freeze kills new growth, because the whole plant is not ruined. The part below the soil has buds which will send up more shoots in a short time, and the only effect caused by frost will be a slightly delayed blooming.
You will find plenty of dahlia roots are available for planting — practically for the asking. One certain way to obtain a supply is to declare interest in growing your own dahlias while examining those of a proud exhibitor-friend. Once, many years ago, I did just this and was surprised shortly thereafter by a carton on my porch — my friend's gift of dahlia roots which were promptly planted.
When in Doubt — Mulch — And Then Mulch Some More!
The dahlia grower must practice mulching because, as you will see, the most essential factor in the successful cultivation of dahlias is an adequate, ever-present supply of soil moisture. No gardener can rest content with soil in which dahlias are to be planted until he has worked into it plenty of moisture-retaining humus. When in doubt — mulch — and then mulch some more!
I also like the technique of letting the soil warm up before applying mulch. This common-sense practice applies to dahlias. When I mulch, I use loose hay, piling it 6 inches deep, and keep renewing it throughout the season as it packs and thins down.
Second Factor for Success
Like all plants, dahlias need their full share of nourishment, water, sunshine and air. But they differ in one important detail: During the critical growing stage they demand constant attention to the removal of surplus branches and buds.
So when a gardener complains that his dahlia stems are neither long nor strong enough to support even their scanty blooms, I ask if he took the trouble to remove the extra side branches and buds. He usually admits he "just let them grow" and did nothing to help them achieve sound growth.
Left to itself, a dahlia plant grows, branches and rebranches to produce small, unsatisfactory blooms at the tips of the unwanted branches. However, by selection and timely pruning you can achieve flowers, distinguished equally for size and perfection of bloom. Step-by-step, this program calls for: 1. — Topping, 2. — Disbranching, and 3. — Disbudding.
Topping is the earliest and simplest treatment your dahlia requires. Keep a close watch and, as soon as two pairs of leaves appear, pinch the tender young stem just above the second pair. If other chores interfere and a third and fourth pair of leaves show, you may still top the plant, but be sure to do it as originally planned — just above the second pair of leaves.
Disbranching consumes most of the time spent on the care of dahlias and deserves to be done observantly and with real care. After topping, 4 leaves remain and, although it may be invisible, there is a bud in the angle between the stem and each of the 4 leaf stalks or petioles. Each of these 4 buds will produce a new, secondary branch or stem — altogether 4 — which you will permit to grow and to flower.
But, as each secondary stem develops, allow only one bud to grow. (Choose the stronger of the lower pair.) Remove the other branch growths by snapping them off carefully or snipping them neatly with a sharp knife. After disbranching, the plant has 4 primary stems each bearing a secondary branch at its base — a total of 8 stems. All new side branches must be removed as they appear, if the plant is to produce really large and perfect blooms.
Disbudding is done when 3 flower buds appear at the end of the 4 primary stems. Save the best — probably the one in the middle — and remove the others rigorously. After each of the 4 primary stems has produced its one big bloom, cut it about half-way down the stalk. The 4 secondary stems will continue to grow and, given favorable conditions, will also produce one flower apiece — a total of 8 maximum blooms to the plant.
The above program of topping, disbranching and disbudding applies only to the large-flowering variety of dahlias. The smaller varieties are permitted to grow as they will.
As I work on the dahlias, removing unwanted branches and buds, I examine each plant carefully to see if it needs staking. Just enough tying is done to support heavy blooms or to steady branches which move too freely in the wind or when touched. This experience of working with your hands among your own plants is valuable and there is no substitute for it. It is the only way to get to know your garden.
The tying material varies. Some gardeners insist on raffia; some say that nothing but strips of cloth will do. For years I have used 8-ply twine, which comes conveniently in large cones, and have never seen any damaged stems among my staked plants.
Organic Method Best Way To Control Disease and Insects
Despite every precaution and the most scrupulous planning, ideal conditions seldom prevail in any garden for extended periods of time, and some damage from insects and disease must be expected. But hard experience has taught me that healthy plants can resist natural enemies successfully and that using toxic sprays never gave me real control of a bad situation.
The only insects to pester my dahlias include aphids, corn borers, thrips, Japanese beetles and tarnished plant bugs. Of these only the last two have caused serious damage.
Japanese beetles give me little or no trouble. I keep some raspberry bushes and grapevines nearby to serve as a trap crop. I patrol these bushes and vines, hand-picking beetles as I go, to achieve satisfactory control. I expect sometime in the near future to use the milky spore disease as a countermeasure to obtain full protection. Good results have also reportedly been obtained by a New Jersey dahlia grower who covers his buds and blooms with plastic bags to foil the beetles.
For us, the most serious enemy is the tarnished plant bug — about a quarter of an inch long and varying in color from red to green to brown. When you find a badly dwarfed dahlia plant with short internodes and stems that are stiff and brittle, blame the tarnished plant bug.
Sometimes the condition of the plant is superficially good, but some buds are dried up while the blooms are badly distorted. It's best to remove the abnormal buds and cut back the affected stems to the base to give new stems a chance to develop and produce new blooms.
No successful treatment has been discovered to date by plant pathologists for the group of viruses which afflict dahlias. Signs of infection include short internodes, one-sided leaf growth, or leaves with light-green or yellow streaking. I still believe the best way to fight plant disease is to encourage the growth of benevolent soil life — the viruses' natural enemies — by putting plenty of humus in the soil.
A Bonus: Cutting Blooms For Indoor Display
Assuming it's been a good season with the right kind of weather and that you've done everything properly at the right time, it's time to collect a bonus reward — cuttings for indoor display. But first, before touching a single stem, secure a really sharp, efficient cutting knife and fill several large cans or pails with water. They should be about 20 inches high, 12 inches wide, and hold about one foot of water.
Cut the stem free from the stake and then, reaching down to its base, make a clean cut just above the secondary branch. Remove the leaves from the lower 12 inches and, with the cut end of the stem in the water, make a slanting cut just above the lowest node. Make the cut under water so no bubbles of air can seal off the water-conducting cells and prevent water from reaching the bloom and leaves.
Be careful when placing the cut flowers in the containers that no flower touches another flower or leaf. Before storing in a quiet, cool cellar, dampen the blooms with a very fine spray of cool water to prevent drying.
Try to cut your blooms when they contain the most moisture. After sunset is best and I have found that 3 a. m. is the ideal time. When I am exhibiting, I cut my blooms Friday morning for a Saturday show, packing them in boxes during the evening and driving overnight to the place of exhibition.
Digging Dahlias Is Different From Digging Potatoes
Inexperienced gardeners are frequently surprised to learn at the end of the season that dahlia roots are tender and cannot remain in the ground over the winter. Instead, they must be dug up and stored to keep them from freezing and drying because no amount of protection in the field will bring them through the winter unless they are in an area where the ground does not freeze.
The root you planted in May has been busier over the summer than you realize, and when you dig it up you may be surprised at the mass of roots — or clump — it has produced. A clump may consist of anywhere from 3 to 40 roots.
Digging is the only really hard work connected with dahlia growing and is not as simple as digging potatoes, which can stand considerable abuse. Dahlias are something else again and must be treated with care. Start by cutting the plant down to within a few inches of the soil as soon as it has been frost-killed.
When digging, use any tool you like — I am a round-nosed shovel enthusiast. I place the point of the shovel 12 inches from the plant and, using my foot, force it vertically down into the ground as far as it will go, rocking the blade as I remove it to enlarge the slit; then I repeat the operation until a semicircle has been cut around the plant, which is levered loose with the shovel handle. Still using the shovel for support, I lift the clump out of the hole, raising it by the stem, and remove as much soil as possible.
Then, before doing anything else, I take an indelible pencil and write on at least two of the roots the symbols I used to identify that variety during the summer. Such identification will save you a lot of trouble next spring.
Before separating the clumps into their component roots, I wash them, using a 3-by-10-foot frame built of 2-by-6-inch lumber and covered with hardware cloth. I place the clumps on the frame and, using a fine but strong stream from the hose, wash excess soil from between the roots and leave them to drain. Then, as soon as possible (right away is fine) I take them to the cellar and cut the clumps into as many roots as I conveniently can.
When cutting, be sure that a small section of the parent-plant's original stem is left on each root. This bit of stem is the only place where budding can occur and without it your root will not bear. You may recall that the root you planted in the spring had a sprout coming out of the stem part — not from the fleshy part of the root.
Once the clump is cut, I label each of the roots just as I did at digging time. The next — and final — step is to pack the roots in some material to prevent drying, or to wax them. The best packing material is dry sawdust or some form of expanded mica. Sand or soil may be used, but they require watering through the winter.
So we plant, top, disbranch, tie up and disbud; we feed and mulch; we dig, wash and cut up the clumps. But we also see those beautiful blooms in the garden and cut them to admire in the house or we give them to friends who drop by.
We may even take our dahlias to a flower show and compete with other growers and then we return after the judges have done their work. Even a third-place ribbon on a bloom pleases us. When it is something better than that, a blue for first place or now and then a gold ribbon for the Best in the Show, then we know that all this work (which in the main wasn't work at all) was well worth it. Plant at least a few dahlias this year and have fun!


Comments